 Featured Outfit
|
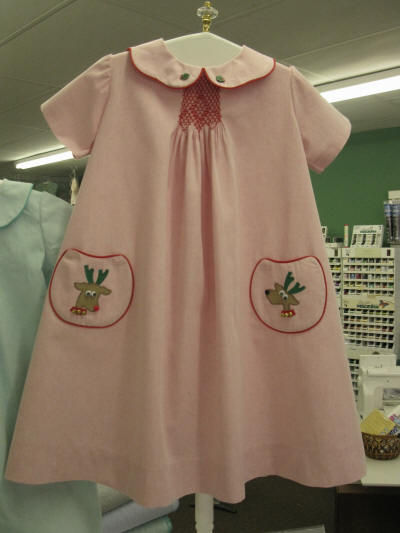
Reindeer Buddies
Pattern: "Bailey" by Bonnie Blue Designs Fabric: Red Chambray 60" wide 100% Cotton Smocking Plate: "Alicia Marie" by PBJKids Appliqué is Ellen McCarn's Small Reindeer Buddies Stop Red Petite Piping and Red 2 holed 1/2" Buttons down the back! I love a little bit of smocking! I can make more in the same amount of time! They are so sweet! A Lesson in Adaptation for Smocking! This is an example of when you find a pattern that fits use it and adapt it for what you need! This pattern doesn't show smocking, but that shouldn't stop you! Changing a pattern for smocking is easily done with a little thought and some planning. First is to figure out how much fabric is needed to give you the pleats you need to do your design. Take into mind that you are slightly limited so you can not just add to much fabric for the dress! This dress has a good collar that meets in the front and comes to center back I like. The sleeves are a nice size for each size of the dress, and I have a choice of sleeve types. I also like the fit. I played with the fabric and the pleater and figured I needed 9" of fabric to give me 38 pleats for my design. I measured the front pattern piece at it's widest point and added my 9" to that. Measure the total length of the pattern and add 2" to that. You can now tear your fabric to these measurements. Now I needed to figure out just where the first pleating thread needed to go. I measured down from the highest point of the shoulder to the lowest part of the neck on my front pattern piece. This worked out to be about 2 1/2" for the size 2 and 2 3/4" for the size 4.(the 2 sizes I did for this project) I marked across the top of my fabric 3" (a little for comfort!) Pleat 12 rows using your line for the first needle guide! Count and find your center valley, count 19 pleats to each side and pull all other pleats out. Tie off pleats to 2" and you are ready to smock! The top and bottom rows are holding rows, don't smock them. Smock your design closer to the bottom so that the collar doesn't cover it up. I backed smocked the top rows just because they are covered. Now you will center your front pattern piece to your fabric, make sure that you have it centered and parallel to the top. Your lowest part of the neck line should be just above the first pleating thread. You shouldn't have any problem because of the few extra inches of fabric we planned for. Outline all the way around the pattern piece and cut it out. Construct the rest of the dress as your pattern calls for. Have fun! and be Creative! E-mail at pbjk@peanutbutter-n-jellykids.com for any other questions you may have! Kits are available for your enjoyment! They come pleated and tied off ready for you to start! Check out "Kits" |

|
[Merchandise]
[What's New]
[Shopping Cart]
[Scrapbook]
[About us] |